每个程序员,心中都住着一个闷骚的小娘子,他们渴望被人关注,成为众人心中的‘神’, 但不是每个人都有社交能力,于是博客、微博应运而生。
或许你没办法拉住别人听你的喋喋不休、也耻于一个人喃喃自语,来吧,书写是你的阿 波罗,记录你荡漾的每一刻心声。
可是问题来了,一个堂堂程序员如果没个自己的博客站,显得多凄凉啊?花钱租服务器?
别逗了,程序员心中伴随闷骚小娘子的,往往还有一个臭屌丝!这可如何是好?既想看
着屌炸天,又不想破财,来吧,Github是你的阿波罗,这儿的一切都是免费的!(私有
服务另说啊)
关于Github,我就不在这里赘述了,不知道的自己面壁撞墙(不是程序员的不用啊)。
只要google一把。
还有,在面对各种专业词汇时,我不会做详细介绍,仅仅附上wikipedia链接,自己打开
查阅即可。
来,咱们开始!
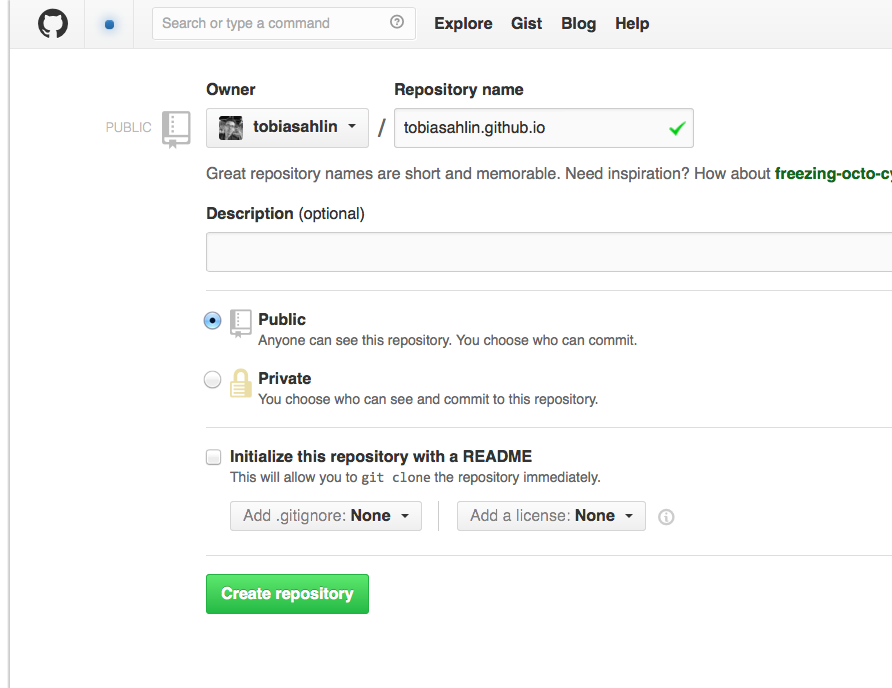
创建一个新的代码仓库
该仓库的名字必须按照如下格式:
<Github 用户名>.github.com,譬如,我的用户名叫tobiasahlin,那这个仓库就起名为:tobiasahlin.github.com
以下步骤凡引用到
Github用户名的地方,都用tobiasahlin代替,以免引起不必要的疑 惑
如下图:

安装
Jekyll-Materialize在命令行中,移动到一个你想要保存你的博客站的目录,执行如下命令(注意修改里面的
tobiasahlin为你的用 户名):
git clone https://github.com/leftstick/jekyll-materiallize.git tobiasahlin.github.com
cd tobiasahlin.github.com
git remote set-url origin git@github.com:tobiasahlin/tobiasahlin.github.com.git
该功能要求
Git已经安装成功,如果没有安装的,请关闭所有的命令行程序,然后移步至 Git下载Git,安装成功后,重新打开命令行,然后执行上述 命令
修改
Jekyll配置打开
_config.yml,找到如下参数,并修改成自己的内容即可:
title : Jekyll Materiallize
tagline: Site Tagline
lang: en
footerDetail: true
author :
  name : Name Lastname
  avatar : false
  introduction : "A brief introduction should be placed here, in order to make the author known well to the reader"
  email : user@email.test
  github : username
  twitter : username
  gitcafe: username
  weibo : weiboID
  facebook : username

production_url : http://username.github.io
参数详解
title 博客名
tagline 权当是副标题吧
lang 多语言控制,支持en,zh。默认是en
footerDetail 详细页脚,true显示,false关闭
author.name 作者,你的大名
author.avatar 头像,false表示使用默认头像
author.introduction 自我介绍
author.email 邮箱
author.github Github用户名
author.twitter twitter用户名
author.weibo 新浪微博用户ID
author.facebook facebook用户名
production_url 你的博客线上地址,即http://tobiasahlin.github.io
至于其他诸如
JB.comments,JB.analytics,JB.sharing等配置,可直接参考Blog-Configuration
- 发布
git add .
git commit -m "blog created"
git push -u origin master
- 欣赏
稍等片刻后,打开http://tobiasahlin.github.io即可看到的你的Material Design博客了。